Sunday, October 29, 2017

Legion of Everblight Army

After years of painting various different Privateer Press models, I finally decided that I want to give playing Warmachine / Hordes a shot. And with the introduction of the Army Box this year, what better time to start. I decided to purchases the Legion of Everblight faction, since they are by far the models that I gravitate towards from Privateer Press.

And as if I don't already have enough different projects going, here I am starting yet another one. I plan on working on the army as fillers whenever I need to take a break from any of my other projects. Ideally I will get more painting and modelling time in, since I can work things in whenever I don't really feel like working on any of the other projects that are currently on my table.

So to kick things off, I'm starting with the starter Battlegroup.


I have already cleaned up and assembled all of the models from the battlegroup and will eventually post individual threads for each model as I work on them. But to get started, I decided to focus on the bases, since I want to have all of the bases for the figures in the army done in a similar fashion.

I filled in the slot for each of the four solid bases using Apoxie sculpt. For the fifth base, I used my dremel to carve out a slot for the clear riser for the Neraph since he is a flying model. The first step was to take each model and decide what kind of base I had in mind for the individual models. I decided that I wanted a couple larger rocks for a couple of them, so I placed those large pieces using super glue. Next, I coated each base with a little Elmer's glue mixed with some water and sprinkled a mixture of a couple different kinds of terrain. After the glue dried, I mixed another coat of Elmer's glue and water which I applied over top of the terrain. This second coat is to ensure that everything is firmly attached to the base. After the glue had dried, I then primed the bases with my black Stynylrez primer through my airbrush.

The picture below shows the bases from the starter group primed and ready to be painted.
 
Next time we will look at how to paint the bases...

Sunday, October 22, 2017

Update

It has been a few months since I have posted anything new.

I attended World Expo in Chicago in July and JerseyFest in September.

World Expo was a great experience. The quality of the entries there was simply amazing. I took my Nurgle Daemon Prince, Warmonger and Heavy Combat Biomech. The Biomech is a piece that I worked on earlier this year mixed in with my work on Fire Wings and the other two entries are my personal favorites from my collection. My Warmonger was picked to be judged and received a Bronze medal.

JerseyFest was hosted at a new venue this year and under new management, but all in all the show was just as much fun as it has been every year. I had the Heavy Combat Biomech as my only entry and it received a Silver.

Sadly, my initial plan to have Fire Wings completed in time for World Expo was apparently a little too aggressive for what I could actually get done. However, I have not abandoned the project, it was simply put on hold and I intend to resume work on it in the next couple of weeks. I have been working on a few other things here and there in between, but as of now I don't really have anything to post for any of those projects.

On a completely different front, I received my first wave core box of Kingdom Death: Monster 1.5 and I intend to post a thread as I start working on some things from that in the near future.

Until then, I posted a few pics of the Heavy Combat Biomech in the gallery.

Enjoy!
 

Monday, May 22, 2017

Fire Wings w/ mounted Beelphegor Part 17

Painting continued...

I actually had got a good bit of painting done last week, so we get a double post :)

Picking up where we left off, this time around we are going to focus on the belly scales. In case you don't remember, the belly scales were base coated in P3 Hammerfall Khaki. And like all of the blocking in for the scales this took a good bit of time, since I had to move slowly lining around all of the nicely airbrushed skin. The following photos show the belly scales after they were glazed in entirety in P3 Traitor Green and then washed with Citdael Agrax Earthshade. The glaze shifted the color slightly all while knocking back the brightness of the base coat and the wash brought out all of the detail. I made a couple passes in order to separate all of the scale. The last thing I did was use Citadel Asurmen Blue just along the edges of the scales where the skin and scales meet.
And a close up...
To be continued...

Fire Wings w/ mounted Beelphegor Part 16

Painting continued...

So, last time we base coated and drybrushed the dragons skin, all leading up to applying some transparents. In the following two photos you can see what the skin looks like after a couple of passes with Garage Kits US Transparent Ultramarine Blue.  Additionally, I base coated all of the scales in Andrea Black and the belly scales were base coated in P3 Hammerfall Khaki. I combined these two steps in order to get a good better idea of what the end result would look like due to the fact that the airbrush base coat on the skin kind of made everything all blend together.
And a close up...
To be continued...

Monday, May 1, 2017

Fire Wings w/ mounted Beelphegor Part 15

It's Dragon time!

Today we are going to look at the first couple steps of painting the dragon. The dragon was started in the same fashion as the base, using DupliColor gray primer. After that the first thing that needed to be done was to get a basecoat down for the dragons skin. For this, I decided to go with Minitaire Nautilus Blue which was airbrushed on the skin and overlapping into some of the scales to ensure that we didn't miss anywhere. This is a pretty murky blue color, but it is meant to be the shadow for the skin tone, so a darker color was desired. After that I applied a drybrush over the entire skin portion with Privateer Press Underbelly Blue.

As you can see in the photo below, we have a nice contract between the lighter and darker color that really makes the detail of the sculpt pop. All of this is leading up to some transparent airbrush work, but for that we will have to wait for another day.
And a close up...
To be continued...

Sunday, April 30, 2017

Fire Wings w/ mounted Beelphegor Part 14

Base continued...

Last time we saw the base the icicles and the bones were base coated and in need of some paint.

The photo below shows the base in its almost finished state. I used some FW Prussian Blue and White inks on the icicles in combination with Citadel Baal Red and Leviathan purple. Essentially I did some wet blending of all of the inks and washes with all of the colors thinned down. It was a back and forth process until I was happy with how they looked. The bones then received a couple of passes of Citadel Agrax Earthshade to adds some depth and weathering to the bones.

The base is not 100% complete, but it is done for now. I will be adding the water effects and snow at the end once the dragon has been painted and mounted on the base.
To be continued...

Sunday, April 9, 2017

Fire Wings w/ mounted Beelphegor Part 13

Base continued...

Last time we posted the start of the painting of the base for this project which detailed the priming, washing and drybrushing of what is ultimately the undercoat for the rest of the painting.

The photo below shows couple passes with a couple of Garage Kits US transparent paints sprayed through my airbrush. I used Giger Aqua, Bruise Purple and Smoke. The primary highlight color is the Giger Aqua with the Bruise Purple being the primary shadow color. I sprayed a couple passes to build up the transparents to achieve the look that I was going for. After getting a good foundation of the colors I did another more targeted drybrush highlight with P3 Morrow White in certain area to provide more interest. All of these highlights were then sprayed over with the transparents again to blend then into the existing paint scheme. The last thing that I did was use some Smoke in some of the deeper recesses to reinforce the shadows more.

Once I was done with any airbrush work, I base coated the icicles with P3 Morrow White and the bones with Vallejo Game Color Bone White.
To be continued...

Tuesday, March 14, 2017

Fire Wings w/ mounted Beelphegor Part 12

Time to start painting...

So for this project, I decided to start with the base. I have a specific vision in mind for how I want the base to look, so I'm going to begin here to ensure that I can tie everything in together in the end. And as far as the theme of the project goes, the base is a pretty important element in the story.

I started with the base primed in gray using DupliColor automotive primer. After getting a nice even base using a couple of coats of the primer, I then washed the entire base with the Nuln Oil shade from Citadel. The whole washing process took a little bit of time so that I could makes sure that I got everywhere and that it covered pretty evenly.

Next I did a couple drybrush passes using Frostbite from P3, as seen below:
And another drybrush pass using Morrow White from P3 and you can see the results below:
The initial drybrush passes were meant primarily to pull out the detail after the wash and the final drybrush pass was meant to reinforce the overall highlights even more. Overall these were just the initial set up steps for the base and all of this will soon be covered up with the actual colors that will make up the final base.

To be continued...

Saturday, March 4, 2017

Fire Wings w/ mounted Beelphegor Part 11

Assembly continued...

And now we get to the rider. The pic below shows the head attached to the cloak and the legs still separate. This is the final sub assembly for the rider as he will be paints as is. The rider fits together flawlessly and also attaches to the dragon seamlessly. He will be painted separately and attached at the very end.
The photo below shows all of the left over pieces which include the saddle, bridle reins, tongue and face for the dragon. Additionally included are the rider's arm, sword and lance. All of these pieces will be assembled after certain parts of the paint process are complete.
And there we have it, the assembly process is as complete as it is going to get until some painting phases are complete. I will include pictures as we progress through the paint process that will detail as things are assembled.

I know it has been a rather long road to get here and this set of photos is rather lackluster for the final assembly post, so in order to end on a high note I'm including the following pic of the dragon primed and as it would look if the wings were attached.

To be continued...

Tuesday, February 21, 2017

Fire Wings w/ mounted Beelphegor Part 10

Assembly continued...

So up until this point I haven't made any mention of what color I am planning to paint the dragon. I realize that the kit is called Fire Wings, however I believe that the title of my piece would be better suited as Ice Wings. That is correct, I will be painting a blue dragon...

Why is this important, well this post outlines the modifications that I am making to the base and they wouldn't really make much sense without divulging that little tidbit of information.

Let's make some icicles.

The photo below shows some pins cut to various lengths and pinned through a piece of balsa wood. The wood is there to provide me a way to work on several of these at once with the added benefit of providing a flat top surface to the icicles themselves.
Now comes the fun part, making the icicles themselves. The following pic shows the final product of two passes using Golden Regular Gel (Matte) medium. The gel was applied liberally with a brush for both coats and shaped accordingly. The gel dried semi clear which doesn't phase me as I intended to paint the icicles from the beginning. If I had desired clear icicles I would have had to use something other than pins for the basis of my forms and a different product such as Woodland Scenics Realistic Water.
All in all I was thrilled with the results especially given the fact that this was my first attempt at making icicles. After allowing the medium to dry fully, I then used a hobby knife to cut around the base of the icicle where it meets the balsa wood. Next came the task of separating the pins from the wood which took a little doing. In hindsight I should have used much thinner balsa wood, but I went with whatever scrap I had laying around at the time.

Finally we have the photo of the base with the icicles attached. In the end I used a total of 5 icicles, but I created many more so that I could choose what worked best in the end. The icicles are all attached via the excess pin that went into the balsa wood.

To be continued...

Saturday, January 28, 2017

Fire Wings w/ mounted Beelphegor Part 9

Assembly continued...

In this post we are going to feature the base.

This first photo shows the bottom of the base. I drill out a hole in the bottom of all of my bases and insert a nut that is fixed in with epoxy. This allows me to use a screw through a piece of wood to mount the finished piece for transport without having to worry about it shifting around and potentially breaking fragile pieces.
The next pic shows the dragons base which will connect to the display base using a piece of brass tubing. I opted for a medium sized piece of brass tube in order to ensure a strong connection point. The dragon as we have seen is rather large and I wanted to make sure that the join to the base was as strong as possible. Upon completion the brass tube will be epoxied into the base and I will also be rather liberal in my application of epoxy between the two pieces.
To be continued...

Fire Wings w/ mounted Beelphegor Part 8

Assembly continued...

Today we have the mount points of the dragon to the base. Below you can see the individual feet and how they will be pinned to the base.

Below we have the mostly assembled dragon temporarily attached the base as they will be painted separately. These pieces fit together perfectly and won't require any extra work during final assembly.
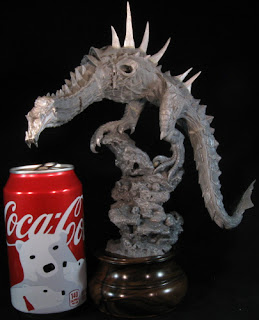
I've included the picture below in order to provide a size reference, as this dragon is anything but small.

 To be continued...

Fire Wings w/ mounted Beelphegor Part 7

Assembly continued...

And today we have the assembled wings shown below. The assembly of the wings was extremely easy since the separate parts were only the two front claws and a single spine.

The following picture shows the wings and the body. The wings and fully assembled body will be painted separately and due to a pretty good fit, very little work will need to be done after the parts are painted for final assembly. I'm expecting that at most a little putty and touch up will be required at.
To be continued...

Sunday, January 22, 2017

Fire Wings w/ mounted Beelphegor Part 6

Assembly continued...

We are finally getting close to having everything all put together. The picture below shows the body and neck.
And below we have the assembled body.
To be continued...

Sunday, January 8, 2017

Fire Wings w/ mounted Beelphegor Part 5

Assembly continued...

The photograph below shows the main body and tail pieces.


 And here we have the body and tail assembly.


 To be continued...

Sunday, January 1, 2017

Fire Wings w/ mounted Beelphegor Part 4

Happy New Year!

Assembly continued...

Below we have the body and the feet. Each leg has a pin inserted into it to connect the individual feet to. These pins are meant to provide stability since the bulk of the weight of the fully assembled figure will rest on the connection of the feet to the legs as well as the connection of the feet to the base.

And here we have the assembled and puttied product of the body and feet.
To be continued...