Assembly continued...
In this post we are going to feature the base.
This first photo shows the bottom of the base. I drill out a hole in the bottom of all of my bases and insert a nut that is fixed in with epoxy. This allows me to use a screw through a piece of wood to mount the finished piece for transport without having to worry about it shifting around and potentially breaking fragile pieces.
The next pic shows the dragons base which will connect to the display base using a piece of brass tubing. I opted for a medium sized piece of brass tube in order to ensure a strong connection point. The dragon as we have seen is rather large and I wanted to make sure that the join to the base was as strong as possible. Upon completion the brass tube will be epoxied into the base and I will also be rather liberal in my application of epoxy between the two pieces.
To be continued...
Saturday, January 28, 2017
Fire Wings w/ mounted Beelphegor Part 8
Assembly continued...
Today we have the mount points of the dragon to the base. Below you can see the individual feet and how they will be pinned to the base.
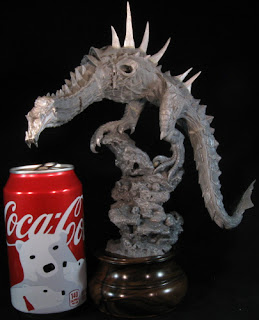
Below we have the mostly assembled dragon temporarily attached the base as they will be painted separately. These pieces fit together perfectly and won't require any extra work during final assembly.
I've included the picture below in order to provide a size reference, as this dragon is anything but small.
To be continued...
Fire Wings w/ mounted Beelphegor Part 7
Assembly continued...
And today we have the assembled wings shown below. The assembly of the wings was extremely easy since the separate parts were only the two front claws and a single spine.
The following picture shows the wings and the body. The wings and fully assembled body will be painted separately and due to a pretty good fit, very little work will need to be done after the parts are painted for final assembly. I'm expecting that at most a little putty and touch up will be required at.
To be continued...
And today we have the assembled wings shown below. The assembly of the wings was extremely easy since the separate parts were only the two front claws and a single spine.
To be continued...
Sunday, January 22, 2017
Fire Wings w/ mounted Beelphegor Part 6
Assembly continued...
We are finally getting close to having everything all put together. The picture below shows the body and neck.
And below we have the assembled body.
To be continued...
We are finally getting close to having everything all put together. The picture below shows the body and neck.
And below we have the assembled body.
To be continued...
Sunday, January 8, 2017
Fire Wings w/ mounted Beelphegor Part 5
Assembly continued...
The photograph below shows the main body and tail pieces.
And here we have the body and tail assembly.
To be continued...
The photograph below shows the main body and tail pieces.
And here we have the body and tail assembly.
Sunday, January 1, 2017
Fire Wings w/ mounted Beelphegor Part 4
Happy New Year!
Assembly continued...
Below we have the body and the feet. Each leg has a pin inserted into it to connect the individual feet to. These pins are meant to provide stability since the bulk of the weight of the fully assembled figure will rest on the connection of the feet to the legs as well as the connection of the feet to the base.
And here we have the assembled and puttied product of the body and feet.
To be continued...
Subscribe to:
Comments (Atom)


